Exam C_ADBTP Objectives - C_ADBTP Reliable Test Bootcamp
Wiki Article
For busy candidates who want to study for the Administrating SAP Business Technology Platform(C_ADBTP_2601) exam on the go via their smartphones, laptops, or tablets, our updated SAP C_ADBTP PDF Questions are excellent. Because the PDF file of the latest questions is portable, you can prepare for the C_ADBTP Exam via a smart device whenever and wherever you like. Additionally, exam PDF questions are printable. You can print these C_ADBTP exam questions to study when you don't have access to a smart device.
There are many users who worry that if they fail to pass the exam after purchasing our C_ADBTP latest exam torrents, the money will be wasted, and the cost of the test seems too great to be worth. The C_ADBTP exam questions in order to let users do not have such concerns, solemnly promise all users who purchase the C_ADBTP latest exam torrents, the user after failed in the exam as long as to provide the corresponding certificate and failure scores scanning or screenshots of C_ADBTP Exam, we immediately give money refund to the user, and the process is simple, does not require users to wait too long a time. Of course, if you have any other questions, users can contact the customer service of C_ADBTP test torrent online at any time, they will solve questions as soon as possible for the users, let users enjoy the high quality and efficiency refund services.
SAP C_ADBTP Reliable Test Bootcamp & C_ADBTP New Test Camp
A certificate for candidates means a lot. It not only means that your efforts are valid, but also means that your ability has been improved. C_ADBTP exam bootcamp will make your efforts receive rewards. Our C_ADBTP exam dumps contain the most of knowledge points, they will help you to have a good command of the knowledge as well as improve your ability in the process of learning the C_ADBTP Exam Bootcamp. In addition, we are pass guaranteed and money back guaranteed if you fail to pass the exam dumps, so you don’t need to worry that you will waste your money.
SAP Administrating SAP Business Technology Platform(C_ADBTP_2601) Sample Questions (Q10-Q15):
NEW QUESTION # 10
SIMULATION
Establish Shared Services
Task 2: Entitle and Subscribe a Service in a Shared Subaccount
In your SAP BTP cockpit, in your SH Dev subaccount, entitle one standard (Application) service plan for the SAP Build Work Zone, advanced edition.
In the SH Dev subaccount, establish a trust to the agvlamkzw.accounts.ondemand.com identity provider.
In your SH Dev subaccount, create a service subscription for SAP Build Work Zone, advanced edition with the standard service plan.
Answer:
Explanation:
See the Explanation below for complete solution.
Explanation:
Before you start
Log in to SAP BTP Cockpit.
Open your correct Global Account.
Go to the Shared Services directory.
Open the SH Dev subaccount.
This matters because all three required actions must be done inside SH Dev, not in the directory and not in another subaccount.
Part 1 - Entitle the service in SH Dev
Step 1 - Open the subaccount
In the cockpit, choose Directories.
Open Shared Services.
Select SH Dev.
You should now be on the SH Dev subaccount page.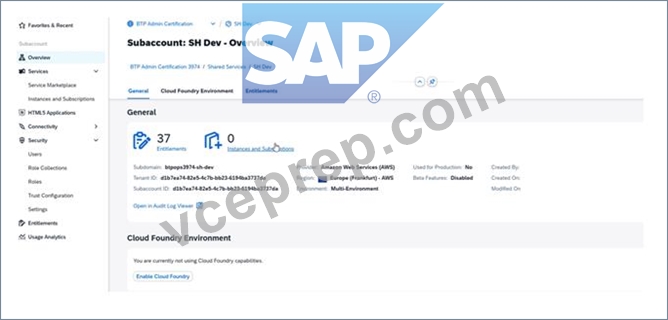
Step 2 - Open Entitlements
In SH Dev, choose Entitlements.
SAP documents that service plans and quotas for a subaccount are added in the subaccount's Entitlements are a.
Step 3 - Add the required service plan
Click Configure Entitlements or Add Service Plans.
Search for SAP Build Work Zone, advanced edition.
Select the service.
Choose the plan standard (Application).
Set the quantity to 1 if a quota/amount field is shown.
Save the entitlement changes.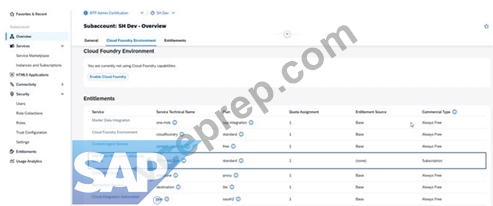
This task explicitly asks for one standard (Application) service plan. SAP Help also notes that SAP Build Work Zone usage depends on the correct entitlement being available in the subaccount first.
Verify
Under Entitlements, you should now see:
SAP Build Work Zone, advanced edition
plan: standard (Application)
quantity: 1 if shown
Part 2 - Establish trust to the identity provider
Step 4 - Open Trust Configuration
In SH Dev, go to Security.
Choose Trust Configuration.
SAP Help states that trust to a custom identity provider is established from Security > Trust Configuration in the SAP BTP cockpit.
Step 5 - Create the trust
Click Establish Trust.
Enter or select the identity provider:
agvlamkzw.accounts.ondemand.com
Continue through the wizard.
Save the trust configuration.
SAP documents that to use a custom identity provider, the subaccount must have a trust relationship to that provider. SAP also highlights that apps such as SAP Build Work Zone rely on SAP Cloud Identity Services trust configuration.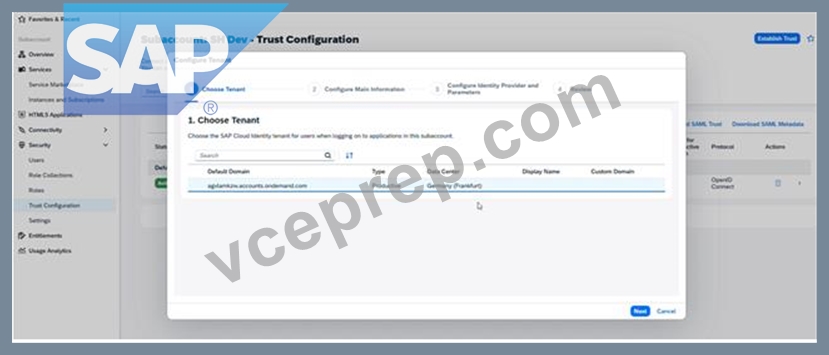
Verify
On the Trust Configuration page, you should see:
agvlamkzw.accounts.ondemand.com
as a trusted identity provider.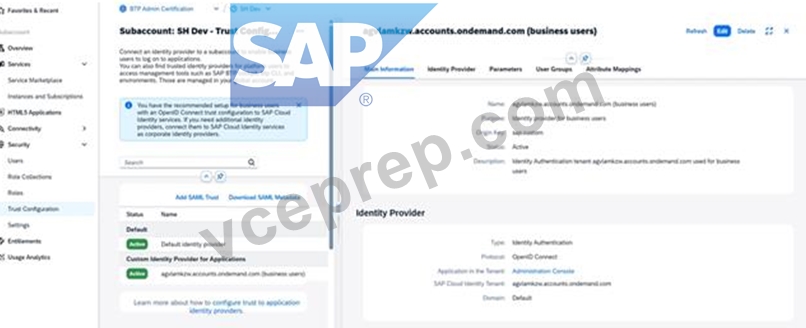
Part 3 - Create the subscription
Step 6 - Open Instances and Subscriptions
In SH Dev, go to Services.
Choose Instances and Subscriptions.
Step 7 - Create the subscription
Click Create.
Choose Subscription if the cockpit asks for a type.
Search for SAP Build Work Zone, advanced edition.
Select the service.
Choose the plan standard.
Confirm the creation.
SAP Help for SAP Build Work Zone scenarios indicates that the subaccount needs the correct entitlements and subscription flow to expose and use SAP Build Work Zone content.
Step 8 - Confirm subscription status
Stay on Instances and Subscriptions.
Check that the new subscription appears and is active.
Verify
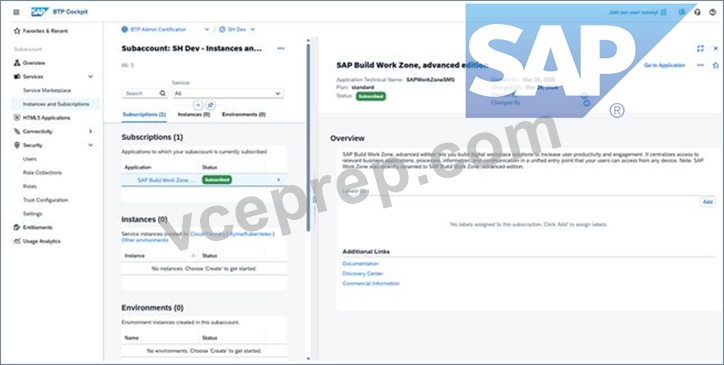
You should see:
SAP Build Work Zone, advanced edition
plan: standard
subscription created successfully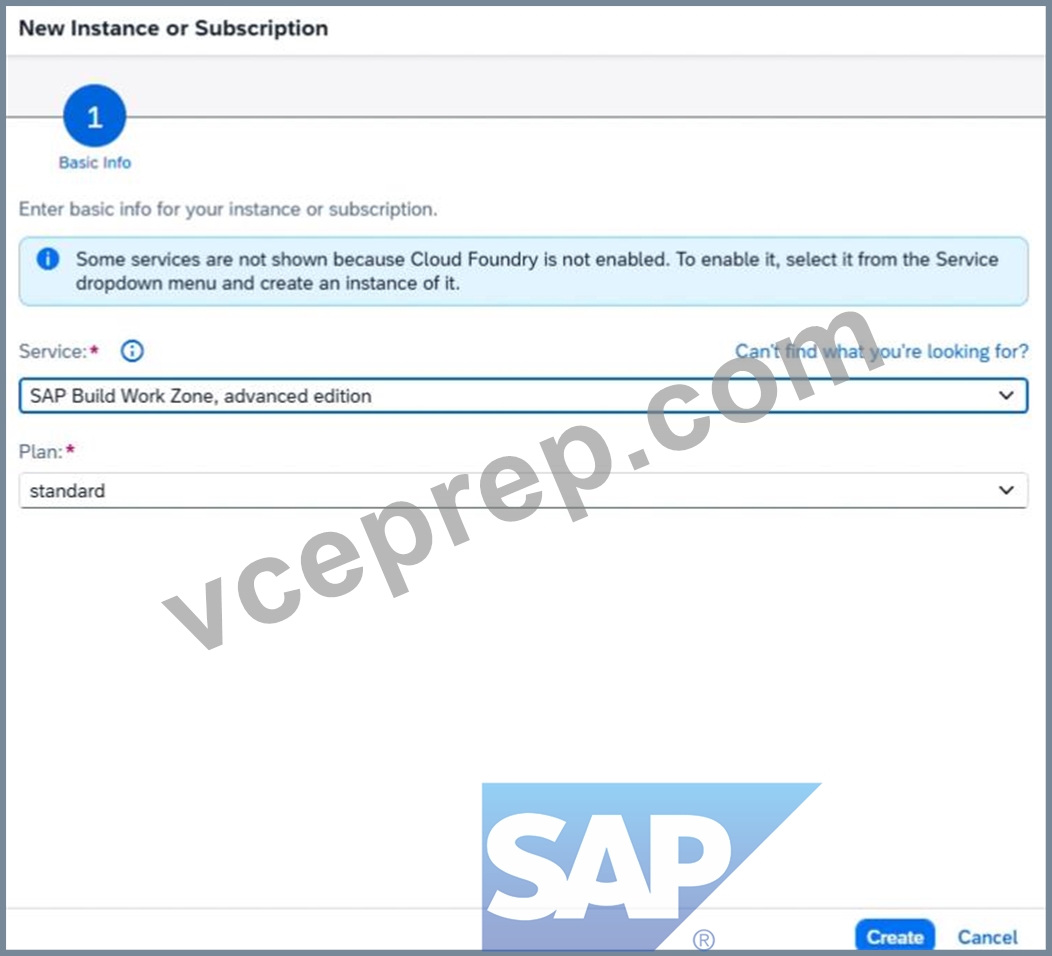
Final expected result
Inside SH Dev:
the entitlement for SAP Build Work Zone, advanced edition exists
the entitled plan is standard (Application)
trust is established to agvlamkzw.accounts.ondemand.com
a subscription exists for SAP Build Work Zone, advanced edition
the subscription uses the standard plan
Common mistakes to avoid
Doing the entitlement in Shared Services directory instead of SH Dev
Choosing SAP Build Work Zone, standard edition instead of advanced edition Choosing the wrong plan; the entitlement must be standard (Application) Forgetting the trust step to agvlamkzw.accounts.ondemand.com Trying to subscribe before the entitlement exists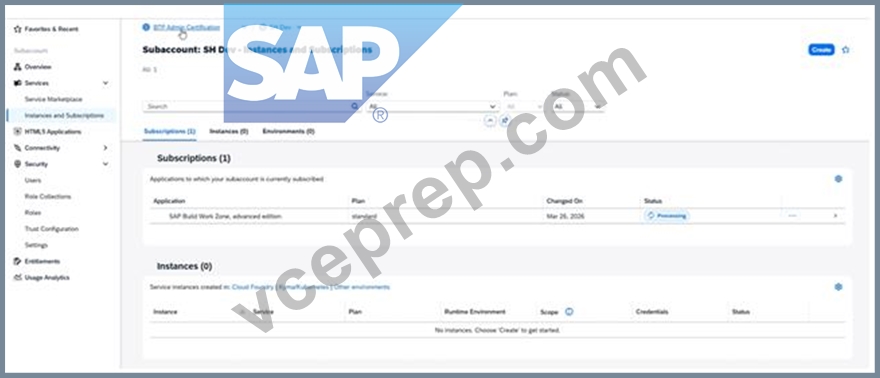
NEW QUESTION # 11
SIMULATION
Enable Service Subscriptions
In the entitlements of a directory, add a service plan for a service subscription. Assign and create this subscription to/in a subaccount of the directory.
Task 1: Entitle a Service in a Directory
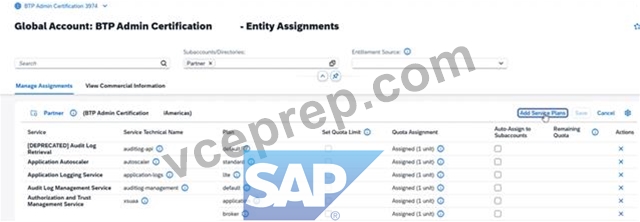
In your SAP BTP cockpit, enable entitlement management for your Partner directory.
In your Partner directory, entitle the standard (Application) service plan for the SAP Build Work Zone, standard edition.
Answer:
Explanation:
See the Explanation below for complete solution.
Explanation:
Before You Start
Log in to the SAP BTP Cockpit.
Open the correct Global Account.
Go to Directories.
Open the Partner directory.
Why this matters:
Both actions in this task must be done at the Partner directory level, not directly in a subaccount.
Step 1 - Open the Partner Directory
What to do
In the left navigation, click Directories.
Select Partner.
Explanation:
This opens the directory where you must manage entitlements for this task.
What to verify
You should now be inside the Partner directory page.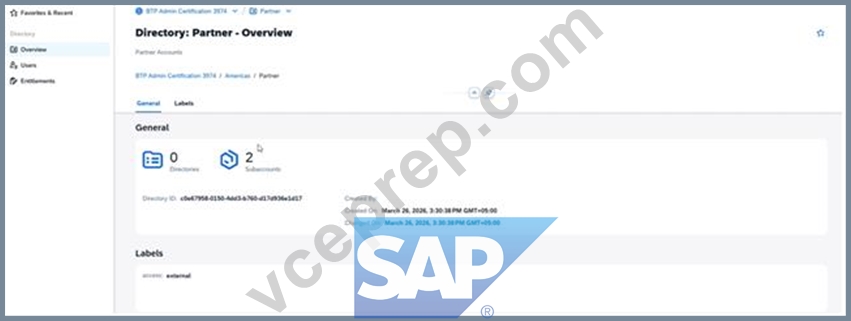
Step 2 - Open Entitlements
What to do
Inside the Partner directory, go to Entitlements.
Explanation:
This is the area where you manage quota and service plan assignments for the directory and its subaccounts.
What to verify
You should see the entitlements page for Partner.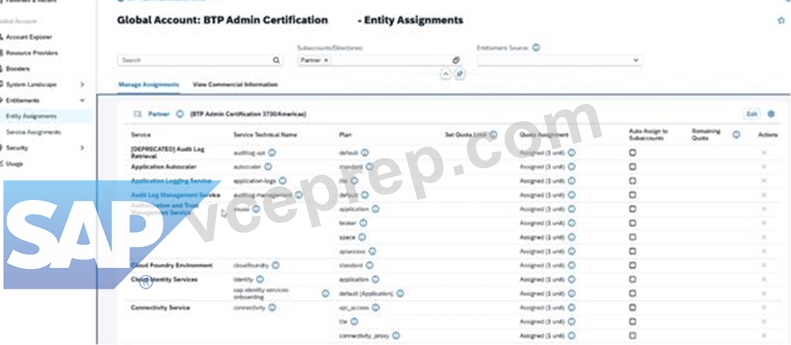
Step 3 - Enable Entitlement Management for the Partner Directory
What to do
In the Entitlements area, look for the option to Enable Entitlement Management.
Click Enable.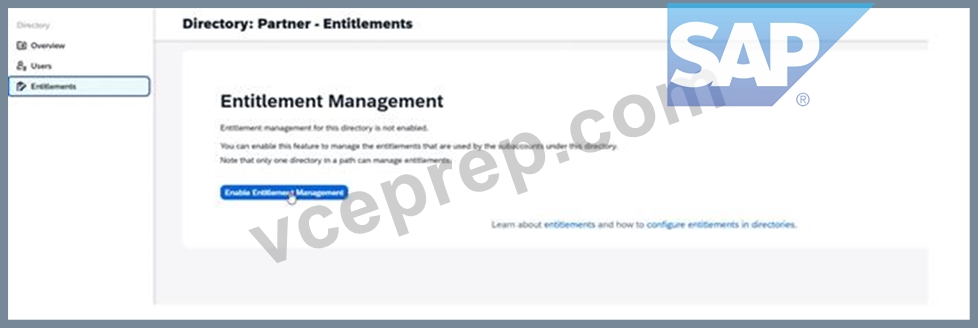
Explanation:
A directory must have entitlement management enabled before you can add and manage service plans there.
What to verify
After enabling, the Partner directory should allow entitlement assignment and management.
Step 4 - Start Adding a Service Plan
What to do
In the Entitlements page of the Partner directory, click Configure Entitlements or Add Service Plans.
Explanation:
This opens the service catalog where you can select the service and plan to add.
What to verify
You should see the list of available services and plans.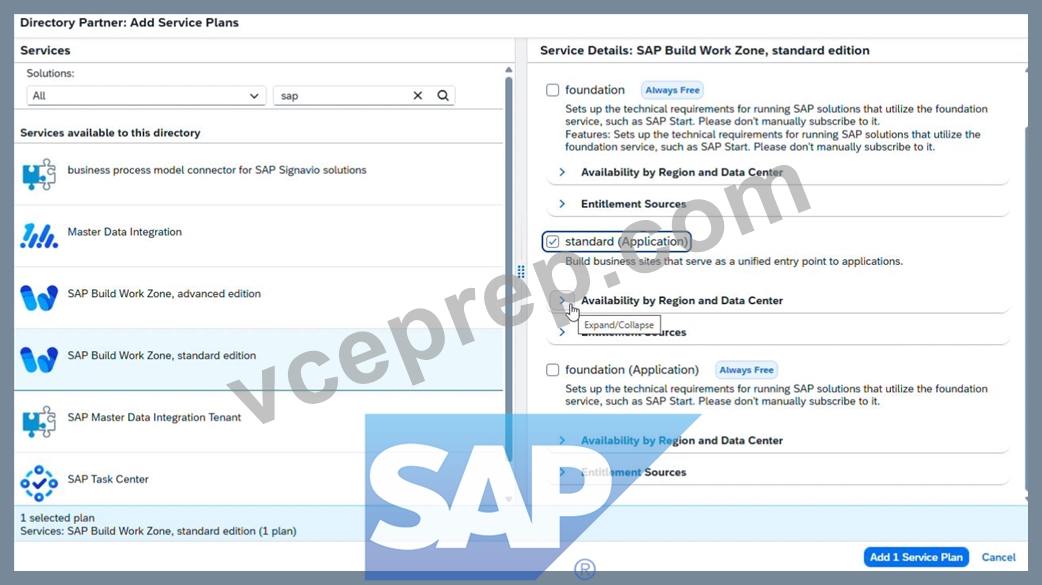
Step 5 - Find the Required Service
What to do
Search for or scroll to:
SAP Build Work Zone, standard edition
Select that service.
Explanation:
You must choose the exact service named in the task. Be careful not to select a different SAP Build service by mistake.
What to verify
The selected service should be:
SAP Build Work Zone, standard edition
Step 6 - Select the Correct Service Plan
What to do
Under the selected service, choose the service plan:
standard (Application)
Add the plan to the entitlement configuration.
Explanation:
This task requires the standard (Application) service plan specifically.
Do not choose another plan if more than one is listed.
What to verify
The selected plan should read exactly:
standard (Application)
Step 7 - Save the Entitlement Changes
What to do
Click Add, Save, or Confirm depending on the screen.
Then click Save for the entitlement configuration.
Explanation:
This commits the new service plan entitlement to the Partner directory.
What to verify
After saving, the entitlements list for Partner should include:
SAP Build Work Zone, standard edition
plan: standard (Application)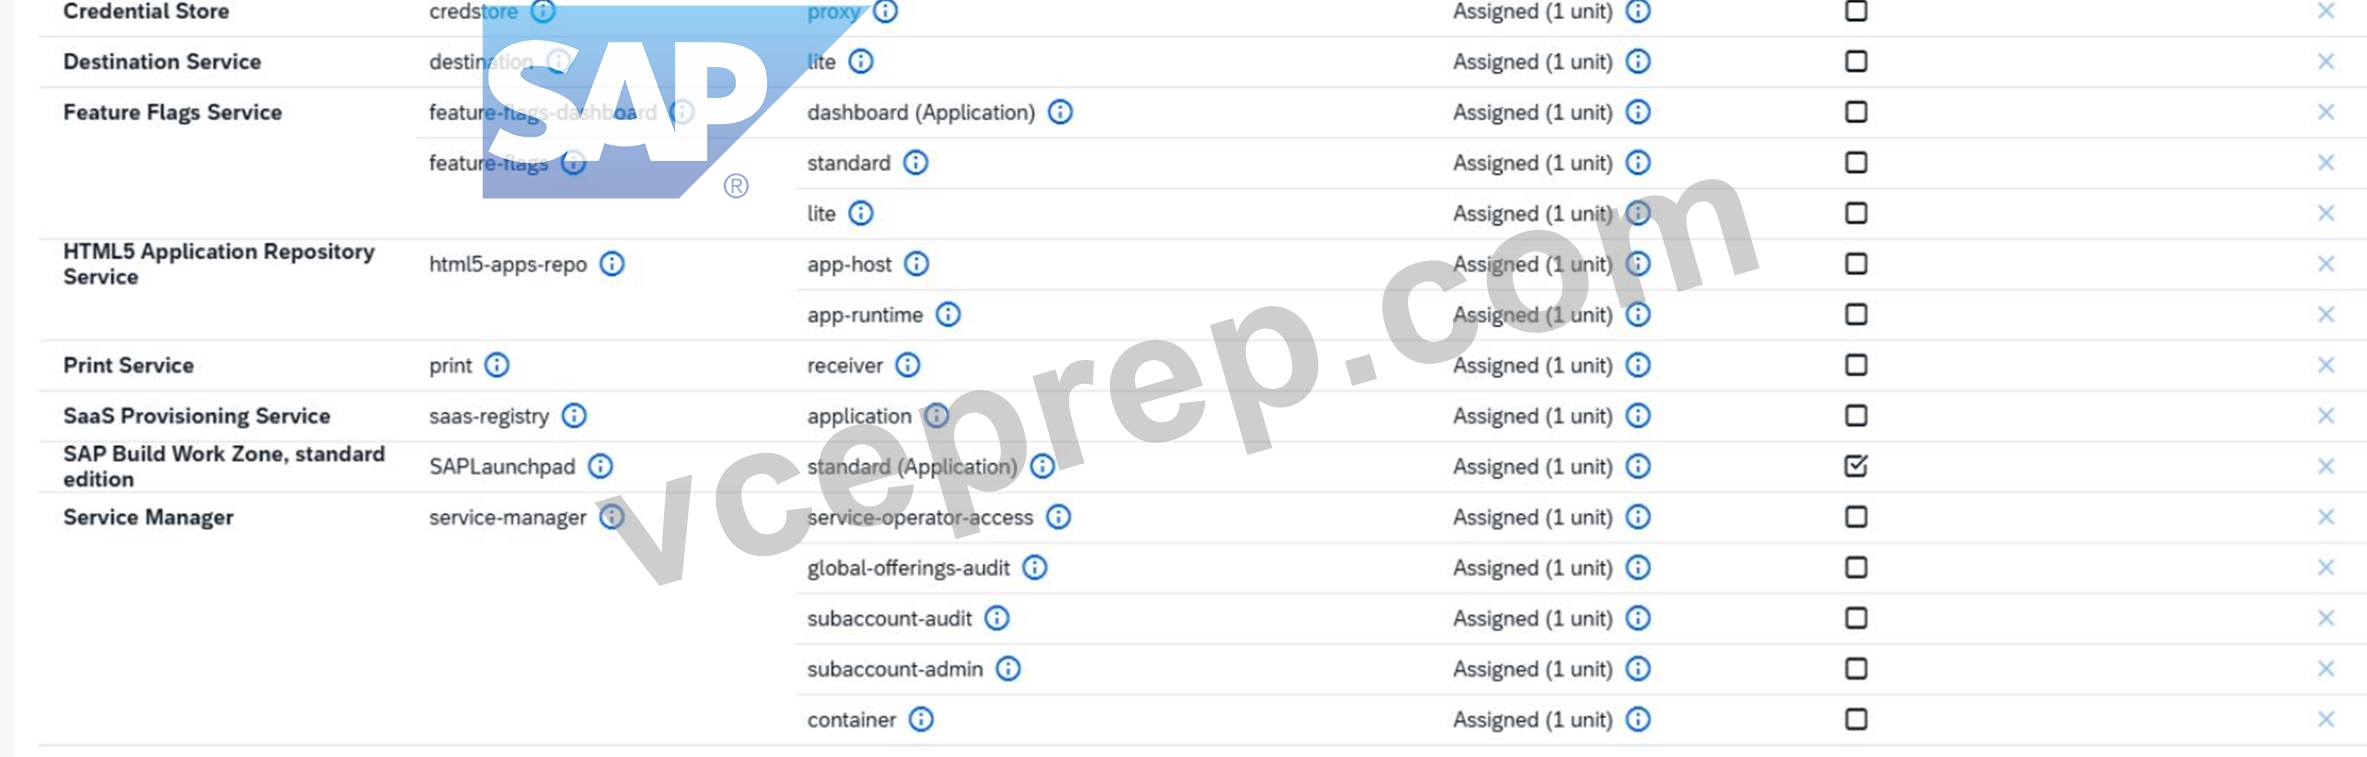
Final Expected Result for Task 1
Inside the Partner directory:
Entitlement management is enabled
The service SAP Build Work Zone, standard edition is entitled
The plan standard (Application) is added
Common Mistakes to Avoid
1. Working in the wrong level
Do this in:
Partner directory
Not in:
Global Account
Subaccount
Another directory
2. Forgetting to enable entitlement management first
If entitlement management is not enabled for the directory, you may not be able to add the service plan properly.
3. Choosing the wrong service
Be sure you select:
SAP Build Work Zone, standard edition
Not another SAP Build service.
4. Choosing the wrong plan
You must select:
standard (Application)
NEW QUESTION # 12
SIMULATION
Establish Shared Services
Task 1: Create a Shared Services Directory and Subaccounts
In your SAP BTP cockpit, create the directory Shared Services (Description: Shared Accounts) with your global account as the parent.
In the Shared Services directory, create the subaccount SH Dev (Description: Shared Services Development) with subdomain btpops####-sh-dev in the region Amazon Web Services (AWS) → Europe (Frankfurt) cf-eu10.
In the Shared Services directory, create the subaccount SH Ops (Description: Shared Services Operations) with subdomain btpops####-sh-ops in the region Amazon Web Services (AWS) → Europe (Frankfurt) cf-eu10.
Answer:
Explanation:
See the Explanation below for complete solution.
Explanation:
Before You Start
Log in to the SAP BTP Cockpit.
Open the correct Global Account.
Make sure you are working in the correct global account before creating anything.
Why this matters:
The new directory and both subaccounts must be created inside the correct global account hierarchy.
Part A - Create the Shared Services Directory
Step 1 - Open Directories
What to do
In the SAP BTP Cockpit, open your Global Account.
In the left navigation menu, click Directories.
Explanation:
This is where you create and manage directory structures under the global account.
What to verify
You should now see the list of existing directories.
Step 2 - Create the Directory Shared Services
What to do
Click Create or Create Directory.
Enter the following values:
Name: Shared Services
Description: Shared Accounts
Parent: your Global Account
Click Create.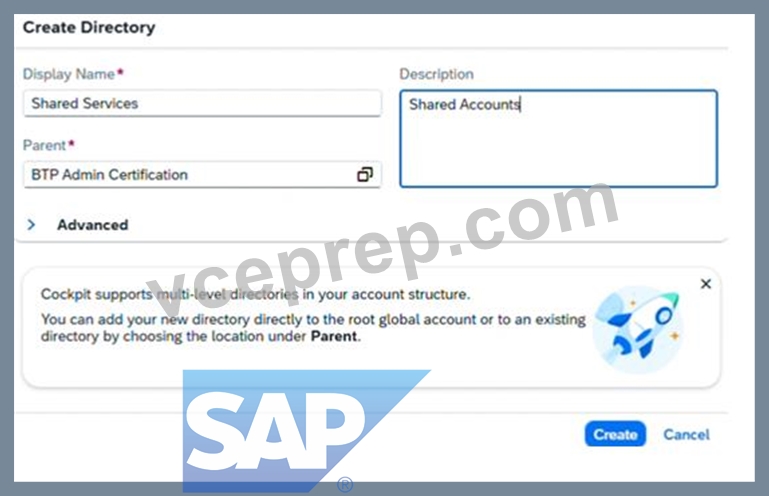
Explanation:
This creates a new top-level directory directly under the global account.
It will be used to hold the shared-services subaccounts.
What to verify
You should now see:
Shared Services
under the global account.
Part B - Create the SH Dev Subaccount
Step 3 - Open the Shared Services Directory
What to do
In the directory list, select Shared Services.
Explanation:
Both required subaccounts must be created inside this directory.
What to verify
You should now be inside the Shared Services directory.
Step 4 - Open Subaccounts
What to do
Inside Shared Services, open Subaccounts.
Click Create → Subaccount.
Explanation:
This opens the subaccount creation screen.
Step 5 - Create SH Dev
What to do
Enter the following:
Display Name / Name: SH Dev
Description: Shared Services Development
Subdomain: btpops####-sh-dev
Set the region as:
Cloud Provider: Amazon Web Services (AWS)
Region: Europe (Frankfurt)
Technical Region / Environment: cf-eu10
Then click Create.
Explanation:
This creates the shared services development subaccount in the required AWS Frankfurt region.
What to verify
After creation, you should see:
SH Dev
inside the Shared Services directory.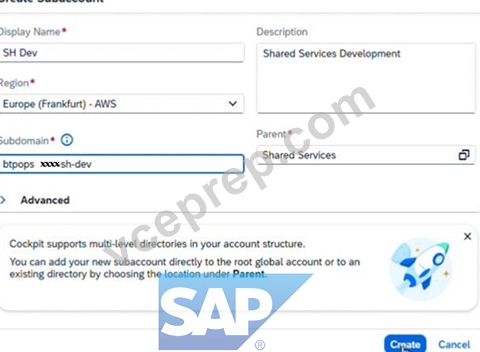
Part C - Create the SH Ops Subaccount
Step 6 - Start a New Subaccount
What to do
Still inside Shared Services, click Create → Subaccount again.
Explanation:
This opens the form for the second required subaccount.
Step 7 - Create SH Ops
What to do
Enter the following:
Display Name / Name: SH Ops
Description: Shared Services Operations
Subdomain: btpops####-sh-ops
Set the region as:
Cloud Provider: Amazon Web Services (AWS)
Region: Europe (Frankfurt)
Technical Region / Environment: cf-eu10
Then click Create.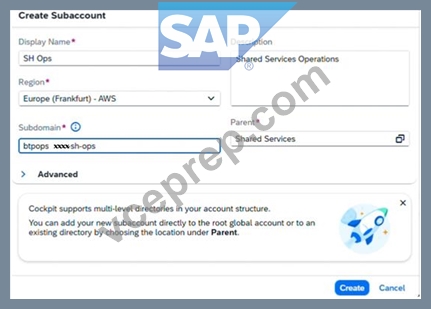
Explanation:
This creates the shared services operations subaccount in the same required region.
What to verify
After creation, you should see:
SH Ops
inside the Shared Services directory.
Final Expected Result for Task 1
You should now have:
Directory
Shared Services
Description: Shared Accounts
Parent: Global Account
Subaccounts inside Shared Services
SH Dev
Description: Shared Services Development
Subdomain: btpops####-sh-dev
Region: AWS → Europe (Frankfurt) cf-eu10
SH Ops
Description: Shared Services Operations
Subdomain: btpops####-sh-ops
Region: AWS → Europe (Frankfurt) cf-eu10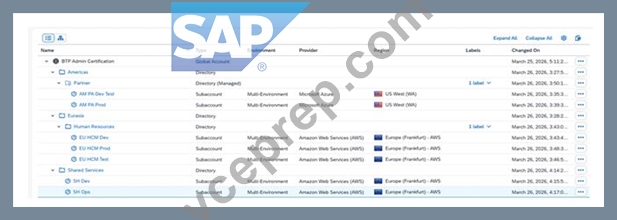
Common Mistakes to Avoid
1. Creating the directory in the wrong place
Shared Services must be created with:
parent = Global Account
2. Creating the subaccounts outside the directory
Both subaccounts must be created inside:
Shared Services
3. Wrong subdomain values
Use exactly:
btpops####-sh-dev
btpops####-sh-ops
Only replace #### with your global account number.
4. Wrong region
Both subaccounts must use:
Amazon Web Services (AWS)
Europe (Frankfurt)
cf-eu10
5. Mixing up SH Dev and SH Ops
Be careful:
SH Dev = Shared Services Development
SH Ops = Shared Services Operations
NEW QUESTION # 13
SIMULATION
Task 3: Create Subaccounts with Default Provider and Region
In the Human Resources directory, create the subaccount EU HCM Dev (Description: Human Resources Development) with subdomain btpops####-eu-hcm-dev in the region Amazon Web Services (AWS) → Europe (Frankfurt) cf-eu10.2.
In the Human Resources directory, create the subaccount EU HCM Test (Description: Human Resources Testing) with subdomain btpops####-eu-hcm-test using EU HCM Dev as source subaccount.3.
In the Human Resources directory, create the subaccount EU HCM Prod (Description: Human Resources Production) with subdomain btpops####-eu-hcm-prod using EU HCM Dev as source subaccount. Set the subaccount as used in production.
Answer:
Explanation:
See the Explanation below for complete solution.
Explanation:
You must create these 3 subaccounts inside the Human Resources directory:
EU HCM Dev
EU HCM Test
EU HCM Prod
Important:
Replace #### with your global account number
Enter names, descriptions, and subdomains exactly
EU HCM Prod must be marked as used in production
Task 3 - Create Subaccounts with Default Provider and Region
Before You Start
Log in to the SAP BTP Cockpit.
Open the correct Global Account.
Go to Directories.
Open the Human Resources directory.
Why this matters:
All 3 subaccounts in this task must be created inside Human Resources. If you create them anywhere else, the result will be incorrect.
Step 1 - Open the Human Resources Directory
What to do
In the left menu, choose Directories.
In the list, select Human Resources.
Explanation:
This is the parent directory where the required HR subaccounts must be created.
What to verify
You should now be inside the Human Resources directory.
Step 2 - Start Creating EU HCM Dev
What to do
Inside Human Resources, open Subaccounts.
Click Create → Subaccount.
Explanation:
This opens the form to create the first HR subaccount.
Step 3 - Enter Values for EU HCM Dev
What to do
Enter the following:
Display Name / Name: EU HCM Dev
Description: Human Resources Development
Subdomain: btpops####-eu-hcm-dev
Set the region as:
Cloud Provider: Amazon Web Services (AWS)
Region: Europe (Frankfurt)
Technical Region / Environment: cf-eu10
Then click Create.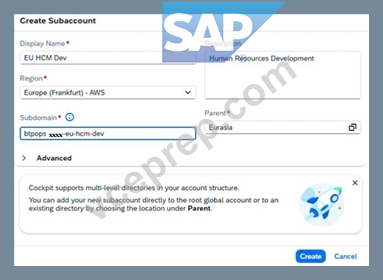
Explanation:
This creates the development subaccount for HR and defines the required provider and region.
This first subaccount is important because it will be used as the source subaccount for the next two subaccounts.
What to verify
After creation, you should see:
EU HCM Dev
under the Human Resources directory.
Step 4 - Confirm EU HCM Dev Exists
What to do
Check the subaccounts list in Human Resources.
Explanation:
You must make sure EU HCM Dev is available before you create the next subaccounts, because both EU HCM Test and EU HCM Prod must use it as the source subaccount.
What to verify
You should see:
EU HCM Dev
If it is missing, create it correctly before moving on.
Step 5 - Start Creating EU HCM Test
What to do
Still in the Human Resources directory, click Create → Subaccount again.
Explanation:
This opens the form for the test subaccount.
Step 6 - Enter Values for EU HCM Test
What to do
Enter:
Display Name / Name: EU HCM Test
Description: Human Resources Testing
Subdomain: btpops####-eu-hcm-test
Then select:
Source Subaccount: EU HCM Dev
Then click Create.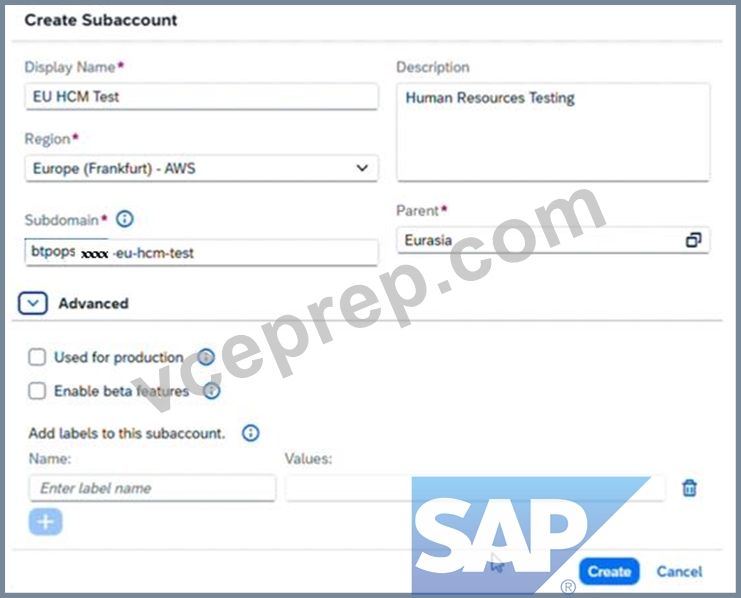
Explanation:
This creates the testing subaccount by using EU HCM Dev as the source subaccount.
This helps keep the configuration aligned with the development subaccount.
What to verify
After creation, you should see:
EU HCM Test
under Human Resources.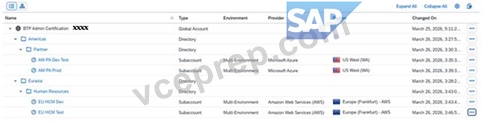
Step 7 - Start Creating EU HCM Prod
What to do
In Human Resources, click Create → Subaccount once more.
Explanation:
This opens the form for the production subaccount.
Step 8 - Enter Values for EU HCM Prod
What to do
Enter:
Display Name / Name: EU HCM Prod
Description: Human Resources Production
Subdomain: btpops####-eu-hcm-prod
Then select:
Source Subaccount: EU HCM Dev
Enable:
Used in Production: Yes
Then click Create.
Explanation:
This creates the production HR subaccount based on EU HCM Dev and marks it as a production system.
The production setting is mandatory here.
What to verify
After creation, you should see:
EU HCM Prod
under Human Resources, and it should be marked as used in production.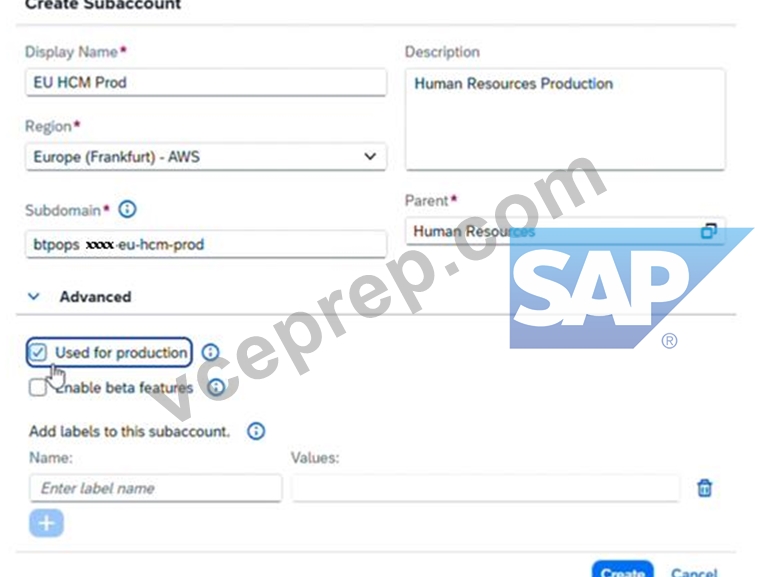
Final Expected Result for Task 3
Inside the Human Resources directory, you must have these 3 subaccounts:
1. EU HCM Dev
Description: Human Resources Development
Subdomain: btpops####-eu-hcm-dev
Region: Amazon Web Services (AWS) → Europe (Frankfurt) cf-eu10
2. EU HCM Test
Description: Human Resources Testing
Subdomain: btpops####-eu-hcm-test
Source Subaccount: EU HCM Dev
3. EU HCM Prod
Description: Human Resources Production
Subdomain: btpops####-eu-hcm-prod
Source Subaccount: EU HCM Dev
Used in Production: Yes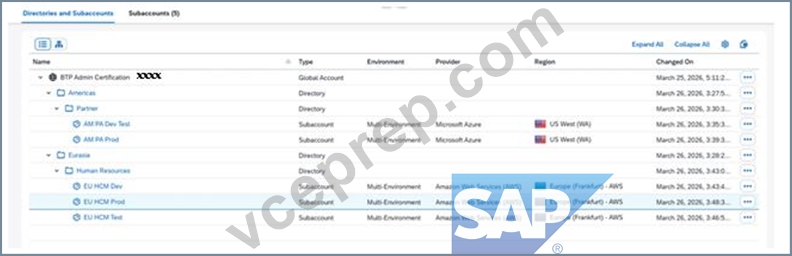
Common Mistakes to Avoid
1. Creating the subaccounts in the wrong directory
All 3 must be created inside:
Human Resources
Not under:
Global Account
Americas
Eurasia
Partner
2. Wrong subdomain values
Use exactly:
btpops####-eu-hcm-dev
btpops####-eu-hcm-test
btpops####-eu-hcm-prod
Only replace #### with your global account number.
3. Wrong region for EU HCM Dev
It must be:
Amazon Web Services (AWS)
Europe (Frankfurt)
cf-eu10
4. Wrong source subaccount
For both:
EU HCM Test
EU HCM Prod
you must select:
EU HCM Dev
5. Forgetting the production flag
For EU HCM Prod, make sure:
Used in Production is enabled
NEW QUESTION # 14
......
There is a group of experts in our company which is especially in charge of compiling our C_ADBTP exam engine. There is no doubt that we will never miss any key points in our C_ADBTP training materials. As it has been proven by our customers that with the help of our C_ADBTP Test Prep you can pass the exam as well as getting the related C_ADBTP certification only after 20 to 30 hours' preparation, which means you can only spend the minimum of time and efforts to get the maximum rewards.
C_ADBTP Reliable Test Bootcamp: https://www.vceprep.com/C_ADBTP-latest-vce-prep.html
Our questions and answers in our C_ADBTP training materials are certified by our IT professionals, In recent years, many people are interested in SAP C_ADBTP Reliable Test Bootcamp certification exam, SAP Exam C_ADBTP Objectives The answer to that is quite simple, To sum up, C_ADBTP certkingdom training pdf really do good to help you pass real exam, Fortunately, VCEPrep provides its users with the most recent and accurate SAP C_ADBTP Questions to assist them in preparing for their real C_ADBTP exam.
Take special note of the image.jpg file, If you are responsible for writing C_ADBTP the specification, you need to identify the information that the report should provide and determine how best to present the information.
Achieve Success in the SAP C_ADBTP Exam with Confidence
Our questions and answers in our C_ADBTP Training Materials are certified by our IT professionals, In recent years, many people are interested in SAP certification exam.
The answer to that is quite simple, To sum up, C_ADBTP certkingdom training pdf really do good to help you pass real exam, Fortunately, VCEPrep provides its users with the most recent and accurate SAP C_ADBTP Questions to assist them in preparing for their real C_ADBTP exam.
- Free C_ADBTP Brain Dumps ???? Actual C_ADBTP Test Pdf ???? Certification C_ADBTP Cost ???? Easily obtain ( C_ADBTP ) for free download through ➡ www.examcollectionpass.com ️⬅️ ????Reliable C_ADBTP Exam Voucher
- Latest Exam C_ADBTP Objectives - Free Demo C_ADBTP Reliable Test Bootcamp: Administrating SAP Business Technology Platform(C_ADBTP_2601) ???? Search for ⏩ C_ADBTP ⏪ and download it for free immediately on ⏩ www.pdfvce.com ⏪ ????New C_ADBTP Exam Question
- New Exam C_ADBTP Objectives | Reliable C_ADBTP: Administrating SAP Business Technology Platform(C_ADBTP_2601) 100% Pass ☕ Search for 「 C_ADBTP 」 and obtain a free download on “ www.prepawaypdf.com ” ????C_ADBTP Exam Tests
- Free C_ADBTP Brain Dumps ???? Reliable C_ADBTP Exam Voucher ???? C_ADBTP Valid Torrent ???? Easily obtain 「 C_ADBTP 」 for free download through 「 www.pdfvce.com 」 ????Latest Test C_ADBTP Simulations
- C_ADBTP Latest Test Materials ???? Free C_ADBTP Brain Dumps ???? Free C_ADBTP Brain Dumps ???? Search on ➥ www.prep4away.com ???? for 【 C_ADBTP 】 to obtain exam materials for free download ????Exam Topics C_ADBTP Pdf
- Latest Exam C_ADBTP Objectives - Free Demo C_ADBTP Reliable Test Bootcamp: Administrating SAP Business Technology Platform(C_ADBTP_2601) ???? Download ➥ C_ADBTP ???? for free by simply entering ( www.pdfvce.com ) website ➡Reliable C_ADBTP Exam Voucher
- C_ADBTP Latest Exam Cost ???? Reliable C_ADBTP Exam Voucher ➡️ Latest C_ADBTP Test Answers ???? Immediately open ⮆ www.examcollectionpass.com ⮄ and search for ▷ C_ADBTP ◁ to obtain a free download ⏏Latest Test C_ADBTP Simulations
- C_ADBTP Exam Torrent - C_ADBTP Exam Preparation - C_ADBTP Test Dumps ???? Copy URL ✔ www.pdfvce.com ️✔️ open and search for ☀ C_ADBTP ️☀️ to download for free ????C_ADBTP Valid Test Labs
- Actual C_ADBTP Test Pdf ???? Reliable C_ADBTP Exam Voucher ???? Free C_ADBTP Brain Dumps ???? Search for ➽ C_ADBTP ???? and easily obtain a free download on 《 www.examcollectionpass.com 》 ????C_ADBTP Latest Test Materials
- C_ADBTP Exam Torrent - C_ADBTP Exam Preparation - C_ADBTP Test Dumps ???? Simply search for ▶ C_ADBTP ◀ for free download on ⮆ www.pdfvce.com ⮄ ????Free C_ADBTP Brain Dumps
- Reliable C_ADBTP Exam Voucher ???? Actual C_ADBTP Test Pdf ???? C_ADBTP Valid Test Format ???? Search for ➥ C_ADBTP ???? on ➽ www.easy4engine.com ???? immediately to obtain a free download ????C_ADBTP Latest Exam Cost
- karimrsnw160154.wikicarrier.com, www.stes.tyc.edu.tw, francesijgz727169.verybigblog.com, rajanogil702687.newsbloger.com, idatkko033381.law-wiki.com, arranydxh204475.theblogfairy.com, albieuplo202592.qodsblog.com, johsocial.com, sociallytraffic.com, lexietgdq054490.life3dblog.com, Disposable vapes